
5209R: New ISO released (CentOS 7.1)
A new 5209R ISO image has been released. This will be the final beta release before declaring it "stable".
We just released another BlueOnyx 5209R ISO image based on CentOS 7.1
This ISO image contains all updates and fixes as of today. The list of pending issues of 5209R has dropped to zero and with that it should be good enough for productive usage. But as we are a cautious bunch we'll continue to call it "beta" for just a little longer.
Among the reported (and fixed) problems was an issue under certain VMware constellations, where the first two boot options of the previous 5209R ISO were unable to detect the disks. The install in "Expert Mode" however did find them.
For that reason the boot options of the current 5209R ISO have been adjusted to this:
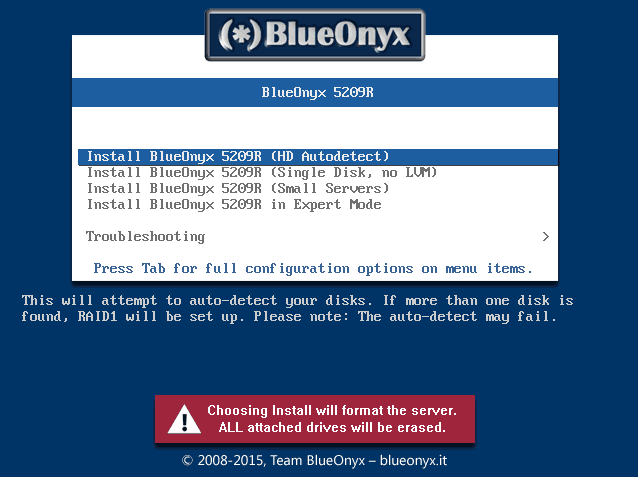
HD Autodetect:
This will attempt to detect your disks automatically. If one disk is found, it installs BlueOnyx on it with LVM. If it finds two disks, it builds an RAID1 array out of the two disks, places an LVM on the resulting partitons and installs BlueOnyx. The autodetect of the disks is heavily scripted and might fail if the disk names are non-standard.
Single Disk, no LVM:
This is the new option. It relies entirely on Anaconda scripts to detect your disk. It will install BlueOnyx on the first disk drive it finds and it will not use LVM. Use this if the "HD Autodetect" does not work for you.
Small Servers:
This boot option again uses "HD Autodetect" and may set up RAID1 if it finds two disks. But it will use smaller and fewer partitions and will not have a dedicated /home partition. Instead the /-partition will have the most space and will have user and group quota enabled.
Post install changes:
We also changed the way how the initial setup is completed to make it more transparent what the installer does and that it actually is doing something.
When the OS install off the ISO has finished you are asked to reboot. At the end of that reboot you will see the login prompt on the console and are told to login as "root" with password "blueonyx".
When you do, then the installer will run the remaining setup tasks to configure the OS. This procedure will take several minutes and you will be able to see the progress on the screen.
Once that is finished you will be prompted to configure the network settings and can then access the web based wizard for configuring the time zone, the passwords and the hostname.
The new ISO images post-install setup is therefore much more transparent about what it does and gives you feedback about the progress.
Please test the new ISO and let us know if you have any problems with it.
← Return